Retseptlar
Retseptlar picozero-dan qanday foydalanish bo'yicha misollarni taqdim etadi.
picozero-ni import qilish
picozero-dan foydalanish uchun skriptingizning yuqori qismiga import qatorini qo'shishingiz kerak bo'ladi.
Faqat kerakli narsalarni vergul , bilan ajratib import qilishingiz mumkin:
from picozero import pico_led, LED
Endi skriptingizda pico_led va LED-dan foydalanishingiz mumkin:
pico_led.on() # Raspberry Pi Pico-dagi LED-ni yoqish
led = LED(14) # GP14 piniga ulangan LED-ni boshqarish
led.on()
Shu bilan bir qatorda, butun picozero kutubxonasini import qilish mumkin:
import picozero
Bunday holda, barcha picozero elementlariga murojaat qilishda prefiks qo'shilishi kerak:
picozero.pico_led.on()
led = picozero.LED(14)
Pico LED

Raspberry Pi Pico-dagi LED-ni yoqish uchun:
from picozero import pico_led

pico_led.on()
LED yonganini ko'rish uchun skriptingizni ishga tushiring.
pico_led-dan foydalanish quyidagiga teng:
pico_led = LED(25)
pico_led-dan LED yordamida yaratilgan tashqi LED-lar kabi foydalanishingiz mumkin.
Pinlar xaritasi (Pin out)
Siz Raspberry Pi Pico-ning pinlari va ularning raqamlarini ko'rsatadigan diagrammasini chiqarishingiz mumkin.
from picozero import pinout

pinout()
        ---usb---
GP0  1  |o     o| -1  VBUS
GP1  2  |o     o| -2  VSYS
GND  3  |o     o| -3  GND
GP2  4  |o     o| -4  3V3_EN
GP3  5  |o     o| -5  3V3(OUT)
GP4  6  |o     o| -6           ADC_VREF
GP5  7  |o     o| -7  GP28     ADC2
GND  8  |o     o| -8  GND      AGND
GP6  9  |o     o| -9  GP27     ADC1
GP7  10 |o     o| -10 GP26     ADC0
GP8  11 |o     o| -11 RUN
GP9  12 |o     o| -12 GP22
GND  13 |o     o| -13 GND
GP10 14 |o     o| -14 GP21
GP11 15 |o     o| -15 GP20
GP12 16 |o     o| -16 GP19
GP13 17 |o     o| -17 GP18
GND  18 |o     o| -18 GND
GP14 19 |o     o| -19 GP17
GP15 20 |o     o| -20 GP16
        ---------
Svetodiodlar (LED)

Raspberry Pi Pico yordamida tashqi svetodiodlarni (LED) boshqarishingiz mumkin.
Miltillash
LED-ni yoqish va o'chirish:
from picozero import LED
from time import sleep

led = LED(14)

led.on()
sleep(1)
led.off()
LED-ni yoqilganidan o'chirilganiga yoki o'chirilganidan yoqilganiga o'tkazish (toggle):
from picozero import LED
from time import sleep

led = LED(14)

while True:
    led.toggle()
    sleep(1)
🚀 Wokwi simulyatorida ishga tushirish
Shu bilan bir qatorda, blink() metodidan foydalanishingiz mumkin.
from picozero import LED

led = LED(14)

led.blink()
Yorqinlik
LED-ning yorqinligini o'rnatish:
from picozero import LED
from time import sleep

led = LED(14)

while True:
    led.brightness = 0  # off
    sleep(1)
    led.brightness = 0.5  # half brightness
    sleep(1)
    led.brightness = 1  # full brightness
    sleep(1)
Puls effekti yaratish:
from picozero import LED
from time import sleep
from math import sin, radians

led = LED(14)

while True:
    for i in range(360):
        angle = radians(i)
        led.brightness = 0.5 + 0.5 * sin(angle)
        sleep(0.01)
Shu bilan bir qatorda, pulse() metodidan foydalanishingiz mumkin.
from picozero import LED

led = LED(14)

led.pulse()
Tugmalar
Raspberry Pi Pico-ga tugmalar va kalitlarni ulashingiz hamda ular bosilganligini aniqlashingiz mumkin.
Button bosilganligini tekshirish:
from picozero import Button
from time import sleep

button = Button(18)

while True:
    if button.is_pressed:
        print("Button is pressed")
    else:
        print("Button is not pressed")
    sleep(0.1)
Har safar Button bosilganda funksiyani ishga tushirish:
from picozero import Button, pico_led
from time import sleep

button = Button(18)

def led_on_off():
    pico_led.on()
    sleep(1)
    pico_led.off()

button.when_pressed = led_on_off
Note
button.when_pressed = led_on_off qatori led_on_off funksiyasini
darhol ishga tushirmaydi, balki tugma bosilganda chaqiriladigan funksiyaga
havola yaratadi. Tasodifan button.when_pressed = led_on_off()-dan foydalanish
when_pressed harakatini None-ga o'rnatadi (bu funksiyaning qaytarish qiymati),
bu esa tugma bosilganda hech narsa sodir bo'lmasligini anglatadi.
Button bosilganda pico_led-ni yoqish va qo'yib yuborilganda o'chirish:
from picozero import Button, pico_led

button = Button(18)

button.when_pressed = pico_led.on
button.when_released = pico_led.off
Sensorli teginish (Touch sensor)
Kapasitiv sensorli teginish datchigi yordamida teginishni aniqlash:
from picozero import TouchSensor, pico_led
from time import sleep

# Capacitive touch sensor output connected to pin 2
touch = TouchSensor(2)

while True:
    if touch.is_touched:
        pico_led.on()
    else:
        pico_led.off()
    sleep(0.1)
Teginish hodisalariga javob berish uchun qayta chaqiruvlardan (callbacks) foydalanish:
from picozero import TouchSensor, pico_led
from time import sleep

touch = TouchSensor(2)

touch.when_touch_starts = pico_led.on
touch.when_touch_ends = pico_led.off
Harakat sensori (Motion sensor)
PIR (Passive Infrared) sensori yordamida harakatni aniqlash:
from picozero import MotionSensor
from time import sleep

pir = MotionSensor(2)

print("PIR Motion Sensor Example")
print("Waiting for motion...")

while True:
    if pir.motion_detected:
        print("Motion detected!")
        sleep(1)
    else:
        print("No motion")
        sleep(0.5)
Harakat hodisalariga javob berish uchun qayta chaqiruvlardan (callbacks) foydalanish:
from picozero import MotionSensor, pico_led
from time import sleep

pir = MotionSensor(2)

# Set up event callbacks
pir.when_motion = pico_led.on
pir.when_no_motion = pico_led.off

# Keep the program running
try:
    while True:
        sleep(1)
except KeyboardInterrupt:
    print("\nShutting down...")
    pico_led.off()  # Make sure LED is off when exiting
RGB svetodiodlar
RGBLED yordamida ranglarni o'rnatish:
from picozero import RGBLED
from time import sleep

rgb = RGBLED(red=2, green=1, blue=0)

rgb.red = 255  # full red
sleep(1)
rgb.red = 128  # half red
sleep(1)

rgb.on() # white

rgb.color = (0, 255, 0)  # full green
sleep(1)
rgb.color = (255, 0, 255)  # magenta
sleep(1)
rgb.color = (255, 255, 0)  # yellow
sleep(1)
rgb.color = (0, 255, 255)  # cyan
sleep(1)
rgb.color = (255, 255, 255)  # white
sleep(1)

rgb.color = (0, 0, 0)  # off
sleep(1)

# slowly increase intensity of blue
for n in range(255):
    rgb.blue = n
    sleep(0.01)

rgb.off()
toggle() va invert()-dan foydalanish:
from picozero import RGBLED
from time import sleep

rgb = RGBLED(red=2, green=1, blue=0)

rgb.color = (255, 165, 0) # orange
sleep(1)

for _ in range(6):
    rgb.toggle()
    sleep(1)

for _ in range(6):
    rgb.invert()
    sleep(1)

rgb.off()
Blink (Miltillash)
Ranglar o'rtasida almashish uchun blink() metodidan foydalaning. Qaysi ranglar ishlatilishini va LED har bir rangda qancha turishini boshqarishingiz mumkin. (0, 0, 0) rangi o'chirilganligini bildiradi.
Siz blink() ma'lum bir marta ishlashini va u tugaguncha kutishni yoki boshqa kodlar ishlashi uchun darhol qaytishini boshqarishingiz mumkin.
from picozero import RGBLED
from time import sleep

rgb = RGBLED(1, 2, 3)

rgb.blink() # does not wait
sleep(6)
rgb.off()
sleep(1)

# blink purple 2 seconds, off 0.5 seconds
rgb.blink(on_times=(2, 0.5), colors=((1, 0, 1), (0, 0, 0)), wait=True, n=3)

rgb.off()
sleep(1)

# blink red 1 second, green 0.5 seconds, blue 0.25 seconds
rgb.blink((1, 0.5, 0.25), colors=((1, 0, 0), (0, 1, 0), (0, 0, 1)), wait=True, n=2)
Pulse (Puls)
LED rangini asta-sekin o'zgartirish uchun pulse()-dan foydalaning. Standart bo'yicha u qizil va o'chirilgan, keyin yashil va o'chirilgan, keyin ko'k va o'chirilgan ranglar orasida puls beradi.
from picozero import RGBLED
from time import sleep

rgb = RGBLED(1, 2, 3)

rgb.pulse() # does not wait
sleep(6)
rgb.off()
sleep(1)

# 2 second to fade from purple to off, 0.5 seconds to change from off to purple
rgb.pulse(fade_times=(2, 0.5), colors=((1, 0, 1), (0, 0, 0)), wait=True, n=3)

rgb.off()
sleep(1)

# 4 seconds to change from red to green, 2 to change from green to blue, then 1 to change from blue back to red
rgb.pulse((4, 2, 1), colors=((1, 0, 0), (0, 1, 0), (0, 0, 1)), wait=True, n=2)
Cycle (Sikl)
cycle() uchun standart ranglar qizildan yashilga, yashildan ko'kka, keyin ko'kdan qizilga sikl bo'lib aylanadi.
from picozero import RGBLED
from time import sleep

rgb = RGBLED(1, 2, 3)

# Gradually colour cycle through colours between red and green, green and blue then blue and red
rgb.cycle()
sleep(4)
rgb.off()
sleep(1)

# Colour cycle slower in the opposite direction
rgb.cycle(fade_times=3, colors=((0, 0, 1), (0, 1, 0), (1, 0, 0)), wait=True, n=2)
rgb.off()
Potensiometr
Potensiometr tomonidan bildirilgan qiymat, kuchlanish va foizni chop etish:
# Potentiometer connected to GP26 (ADC0), GND and 3V

from time import sleep
from picozero import Pot

pot = Pot(26)

while True:
    print(pot.value, pot.voltage)
    sleep(0.1)
Note
Thonny Python muharririda print() chiqishini chizish uchun View > Plotter-ni tanlang.
LED yorqinligini boshqarish uchun potensiometrdan foydalanish:
from picozero import Pot, LED

# Potentiometer connected to GP26 (ADC0), GND and 3V
# LED connected to GP0

pot = Pot(26)
led =  LED(0)

while True:
    led.value = pot.value
Joystik
Joystik potensiometrga o'xshaydi, shuning uchun joystikni boshqarish uchun Pot klassidan foydalanishimiz mumkin.
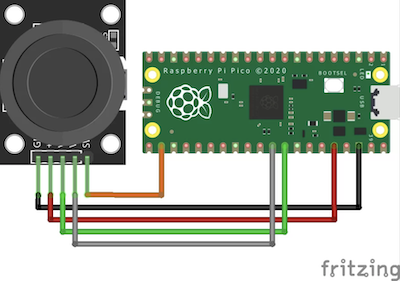
Joystikni minimal, o'rta va maksimal pozitsiyalariga o'tkazing.
from picozero import Pot, Button
from time import sleep

x = Pot(27)
y = Pot(26)
button = Button(17)

while True:
    if button.is_pressed:
        print("Button is pressed\n")

    print("x: " + str(x.raw_value) + ", y: " + str(y.raw_value))
    sleep(0.1)
Buzzer
Quvvat berilganda nota chalinadigan aktiv buzzerni boshqarish:
# Active Buzzer that plays a note when powered
from time import sleep
from picozero import Buzzer

buzzer = Buzzer(10)

buzzer.on()
sleep(1)
buzzer.off()
sleep(1)

buzzer.beep()
sleep(4)
buzzer.off()
Dinamik (Speaker)
Turli xil tonlar yoki chastotalarni chala oladigan passiv buzzer yoki dinamikni boshqarish:
from picozero import Speaker
from time import sleep

speaker = Speaker(5)

def tada():
    c_note = 523
    speaker.play(c_note, 0.1)
    sleep(0.1)
    speaker.play(c_note, 0.9)

def chirp():
    global speaker
    for _ in range(5):
        for i in range(5000, 2999, -100):
          speaker.play(i, 0.01)
        sleep(0.2)


try:
    tada()
    sleep(1)
    chirp()

finally: # Turn the speaker off if interrupted
    speaker.off()
Kuyni chalish
Nota nomlari va davomiyliklaridan (bitlarda) iborat kuyni chalish:
from picozero import Speaker

speaker = Speaker(5)

BEAT = 0.25 # 240 BPM

liten_mus = [ ['d5', BEAT / 2], ['d#5', BEAT / 2], ['f5', BEAT], ['d6', BEAT], ['a#5', BEAT], ['d5', BEAT],
              ['f5', BEAT], ['d#5', BEAT], ['d#5', BEAT], ['c5', BEAT / 2],['d5', BEAT / 2], ['d#5', BEAT],
              ['c6', BEAT], ['a5', BEAT], ['d5', BEAT], ['g5', BEAT], ['f5', BEAT], ['f5', BEAT], ['d5', BEAT / 2],
              ['d#5', BEAT / 2], ['f5', BEAT], ['g5', BEAT], ['a5', BEAT], ['a#5', BEAT], ['a5', BEAT], ['g5', BEAT],
              ['g5', BEAT], ['', BEAT / 2], ['a#5', BEAT / 2], ['c6', BEAT / 2], ['d6', BEAT / 2], ['c6', BEAT / 2],
              ['a#5', BEAT / 2], ['a5', BEAT / 2], ['g5', BEAT / 2], ['a5', BEAT / 2], ['a#5', BEAT / 2], ['c6', BEAT],
              ['f5', BEAT], ['f5', BEAT], ['f5', BEAT / 2], ['d#5', BEAT / 2], ['d5', BEAT], ['f5', BEAT], ['d6', BEAT],
              ['d6', BEAT / 2], ['c6', BEAT / 2], ['b5', BEAT], ['g5', BEAT], ['g5', BEAT], ['c6', BEAT / 2],
              ['a#5', BEAT / 2], ['a5', BEAT], ['f5', BEAT], ['d6', BEAT], ['a5', BEAT], ['a#5', BEAT * 1.5]]

try:
    speaker.play(liten_mus)

finally: # Turn speaker off if interrupted
    speaker.off()
Alohida notalarni chalish
Alohida notalarni chaling va vaqtni boshqaring yoki boshqa harakatni bajaring:
from picozero import Speaker
from time import sleep

speaker = Speaker(5)

BEAT = 0.4

liten_mus = [ ['d5', BEAT / 2], ['d#5', BEAT / 2], ['f5', BEAT], ['d6', BEAT], ['a#5', BEAT], ['d5', BEAT],
              ['f5', BEAT], ['d#5', BEAT], ['d#5', BEAT], ['c5', BEAT / 2],['d5', BEAT / 2], ['d#5', BEAT],
              ['c6', BEAT], ['a5', BEAT], ['d5', BEAT], ['g5', BEAT], ['f5', BEAT], ['f5', BEAT], ['d5', BEAT / 2],
              ['d#5', BEAT / 2], ['f5', BEAT], ['g5', BEAT], ['a5', BEAT], ['a#5', BEAT], ['a5', BEAT], ['g5', BEAT],
              ['g5', BEAT], ['', BEAT / 2], ['a#5', BEAT / 2], ['c6', BEAT / 2], ['d6', BEAT / 2], ['c6', BEAT / 2],
              ['a#5', BEAT / 2], ['a5', BEAT / 2], ['g5', BEAT / 2], ['a5', BEAT / 2], ['a#5', BEAT / 2], ['c6', BEAT],
              ['f5', BEAT], ['f5', BEAT], ['f5', BEAT / 2], ['d#5', BEAT / 2], ['d5', BEAT], ['f5', BEAT], ['d6', BEAT],
              ['d6', BEAT / 2], ['c6', BEAT / 2], ['b5', BEAT], ['g5', BEAT], ['g5', BEAT], ['c6', BEAT / 2],
              ['a#5', BEAT / 2], ['a5', BEAT], ['f5', BEAT], ['d6', BEAT], ['a5', BEAT], ['a#5', BEAT * 1.5]]

try:
    for note in liten_mus:
        speaker.play(note)
        sleep(0.1) # leave a gap between notes

finally: # Turn speaker off if interrupted
    speaker.off()
Servo
Bitta pin, 3.3v va yerga (ground) ulangan servo motor.

Servoni minimal, o'rta va maksimal pozitsiyalariga o'tkazing.
from picozero import Servo
from time import sleep

# Check the specifications SG-90 model
# Pulse width: 500 ~ 2400 µs
servo = Servo(1, 0, 0.5 / 1000, 2.4 /1000)

servo.move_to_degree(0)
sleep(1)

servo.move_to_degree(90)
sleep(1)

servo.move_to_degree(180)
sleep(1)

servo.off()
Servoni minimal va maksimal pozitsiyalari orasida puls qiling.
from picozero import Servo

servo = Servo(1)

servo.pulse()
Servoni minimaldan maksimal pozitsiyaga 100 ta qadam bilan asta-sekin o'tkazing.
from picozero import Servo
from time import sleep

servo = Servo(1)

for i in range(0, 100):
    servo.value = i / 100
    sleep(0.1)

servo.off()
Motor
Ikkita pin (old va orqa) va motor kontroller platasi orqali ulangan motorni boshqarish:
from picozero import Motor
from time import sleep

motor = Motor(14, 15)

motor.start()
sleep(1)
motor.stop()
Robot rover
Oddiy ikki g'ildirakli robot rover yasang.

Roverni 1 soniya davomida oldinga yurgazing va to'xtating:
from picozero import Robot
from time import sleep

robot_rover = Robot(left=(14,15), right=(12,13))

# move forward
robot_rover.forward()
sleep(1)
robot_rover.stop()
Roverni (taxminan) kvadrat bo'ylab harakatlantiring:
from picozero import Robot

robot_rover = Robot(left=(14,15), right=(12,13))

for i in range(4):
    # move forward for 1 second
    robot_rover.forward(t=1, wait=True)
    # rotate to the left for 1 second
    robot_rover.left(t=1, wait=True)
Stepper motor (Stepper motor)
Drayver platasi (masalan, ULN2003) orqali ulangan stepper motorni boshqarish.
Analog soat
Uzluksiz ishlaydigan analog soatning soniya milini yaratish:
from picozero import Stepper

# Second Hand Clock - Continuous 60s Rotation
# One full revolution every 60 seconds.

STEP_DELAY = 60.0 / 2048  # ≈ 0.029296875 seconds per step (full-step)

stepper = Stepper((1, 2, 3, 4), step_delay=STEP_DELAY)

stepper.run_continuous(direction="cw")
Avtomatik pardalar
Vaqtga asoslangan parda boshqaruvchisi:
from picozero import Stepper
from time import localtime, sleep

stepper = Stepper((1, 2, 3, 4), step_sequence="half")

OPEN_TIME = (7, 0)  # Open at 7:00 AM (hour, minute)
CLOSE_TIME = (20, 0)  # Close at 8:00 PM
ROTATIONS = 5  # Number of full rotations needed to fully open/close blinds

# Track state
is_open = False


def open_blinds():
    global is_open
    if not is_open:
        for _ in range(ROTATIONS):
            stepper.rotate(1, "cw")
        is_open = True


def close_blinds():
    global is_open
    if is_open:
        for _ in range(ROTATIONS):
            stepper.rotate(1, "ccw")
        is_open = False


def check_schedule():
    now = localtime()
    current_time = (now.tm_hour, now.tm_min)

    # Check if it's time to open
    if current_time == OPEN_TIME and not is_open:
        open_blinds()

    # Check if it's time to close
    elif current_time == CLOSE_TIME and is_open:
        close_blinds()


# Set starting position (closed)
stepper.reset_position()
is_open = False

# Check every 30 seconds
while True:
    check_schedule()
    sleep(30)
Ichki harorat sensori
Raspberry Pi Pico-ning ichki haroratini Selsiy darajasida tekshiring:
# Choose View -> Plotter in Thonny to see a graph of the results

from picozero import pico_temp_sensor
from time import sleep

while True:
    print(pico_temp_sensor.temp)
    sleep(0.1)
Ultratovushli masofa sensori
Ultratovushli masofa sensoridan (HC-SR04) masofani santimetrda oling:

from picozero import DistanceSensor
from time import sleep

ds = DistanceSensor(echo=2, trigger=3)

while True:
    print(ds.distance)
    sleep(0.1)
LCD displey
I2C shinasi va PCF8574 I2C adapteridan foydalanib LiquidCrystal displeylarida (LCD) belgilarni chop eting.
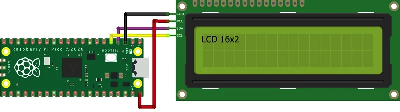
from picozero import I2cLcd
from time import sleep

lcd =  I2cLcd(1, 3, 2)  # i2c_id=1, scl=3, sda=2

lcd.putstr('Hello World')
sleep(1)
lcd.move_to(0, 1)
lcd.putstr('Hello Pi Pico')
Faqat GPIO pinlaridan foydalanib LiquidCrystal displeylarida (LCD) belgilarni chop eting.

from picozero import GpioLcd
from time import sleep

# Create the LCD object
lcd = GpioLcd(rs_pin=16,
              enable_pin=17,
              d4_pin=18,
              d5_pin=19,
              d6_pin=20,
              d7_pin=21,
              num_lines=2,
              num_columns=16)

lcd.putstr('Hello World')
sleep(1)
lcd.move_to(0, 1)
lcd.putstr('Hello Pi Pico')